
User manual · Chapter 7
Acquisition Workflow
Configure web, mail, and Android live acquisitions, including HAR, NetLog, network capture, proxy, Tor, DNS, and recording options.
7.1 Starting A New Acquisition
An acquisition starts from a selected case. Procedure:
- Select an open case in CASES LIST.
- In ACQUISITIONS CONTAINED IN THE SELECTED CASE, choose New Web Acquisition, Live Mobile Acquisition, or New Mail Acquisition according to the planned collection.
- Complete the acquisition metadata fields, especially Acquisition Name and Description.
- Check the displayed Investigator and the automatically assigned Acquisition ID.
- Configure the Browser user agent, Proxy, TOR Proxy, Content Language, and DoH Settings as needed for web collection.
- Review all checkboxes within Acquisition options, including any active video, network, report, resource, and timestamp settings.
Confirm the configuration is appropriate for the legal scope, capture objectives, data protection requirements, and expected storage. 8. Select START NEW ACQUISITION and wait for the appropriate acquisition window. 9. When the session is finished, close it using the application workflow and allow packaging to finish.
Eviquire launches the forensic browser. During the live session, the browser records events and captures selected artifacts. When the session closes, the manager finalizes the acquisition package.
7.1.1 New Acquisition Dialog (Version 6)
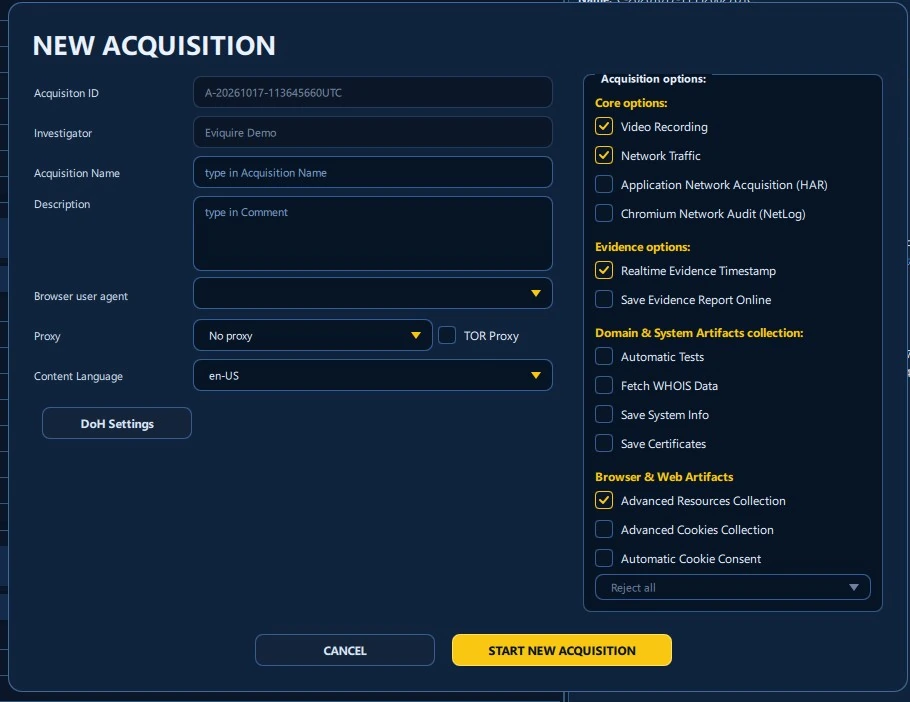
The following fields appear on the web NEW ACQUISITION form:
| Field | Purpose / investigator action |
|---|---|
| Acquisition ID | Generated identifier for this session (starts with A- and ends in UTC). Preserve it unchanged. |
| Investigator | Identity of the investigator recorded for this session. Verify it matches the actual operator. |
| Acquisition Name | A short human-readable name for the collection session. |
| Description | Narrative purpose, collection boundaries, and other relevant context. |
| Browser user agent | Browser identification preset or value presented to target websites. |
| Proxy | Selected routing profile; No proxy is available. |
| TOR Proxy | Enable Tor routing when it is required by scope and available in the build. |
| Content Language | Preferred content or localization setting (for example en-US). |
| DoH Settings | Open the DNS-over-HTTPS configuration dialog. |
Buttons: CANCEL closes the form without starting the new session; START NEW ACQUISITION begins the configured session. Changes in routing, user agent, and language may affect which version of a web page the website presents, so they belong in forensic documentation.
7.2 Selecting Acquisition Type
Eviquire supports multiple acquisition types:
- Web Acquisition: browser-based capture of web pages, downloads, screenshots, source, network, and context artifacts.
- Mobile Acquisition: capture from a connected or configured mobile device workflow.
- Mail Acquisition: capture of email messages and mail-related screenshots.
The acquisition type determines which fields and capture tools are available. For example, mobile acquisition requires device information, while mail acquisition requires mail server, port, protocol, username, and password.
7.2.1 Acquisition Options Explained
The right side of the Version 6 form groups available web acquisition controls into four categories. The presence of a control does not mean it is active: inspect its checkbox state. The values below describe the on-screen labels and their intended acquisition context.
| Group | Option | Meaning / effect |
|---|---|---|
| Core options | Video Recording | Record the visual acquisition session to provide interaction and timing context. |
| Core options | Network Traffic | Capture packet-level network activity where the required components and permissions are available. |
| Core options | Application Network Acquisition (HAR) | Capture application-layer HTTP requests and responses as a HAR artifact. |
| Core options | Chromium Network Audit (NetLog) | Record detailed Chromium browser network diagnostic events. |
| Evidence options | Realtime Evidence Timestamp | Request an external timestamp for the relevant evidence integrity record during finalization. |
| Evidence options | Save each Evidence Report Online | Publish or store individual evidence reports using the enabled online reporting service. Check disclosure policy before activation. |
| Domain & System Artifacts collection | Automatic Tests | Run the configured automatic checks associated with acquisition. |
| Domain & System Artifacts collection | Fetch WHOIS Data | Collect domain-registration context where retrievable. |
| Domain & System Artifacts collection | Save System Info | Preserve operating system and workstation context. |
| Domain & System Artifacts collection | Save Certificates | Preserve certificate/trust-environment information according to the implementation. |
| Browser & Web Artifacts | Advanced Resources Collection | Preserve additional browser/web resources beyond the visible page. |
| Browser & Web Artifacts | Advanced Cookies Collection | Capture a richer collection of cookie-related artifacts; handle as sensitive session material. |
| Browser & Web Artifacts | Automatic Cookie Consent | Allow the configured consent handling behavior. Its action selector is a separate control. |
The screenshot shows Video Recording, Network Traffic, Realtime Evidence Timestamp, and Advanced Resources Collection selected in the illustrated session. This is an example configuration, not a universal recommendation or a statement of defaults for all licenses.
Automatic Cookie Consent Selection
The Automatic Cookie Consent checkbox enables the function; the adjacent drop-down specifies the desired response, such as Reject all in the illustrated dialog. A selection visible in the drop-down does not mean a website’s banner was actually processed; verify the checkbox state and acquisition records. Cookie preferences can affect which page resources load, and site behavior can differ between services. For forensic repeatability, document whether the tool interacted with a consent banner, what response was requested, and whether the operation succeeded.
For capture integrity, do not automatically accept cookies when the collection objective or legal scope requires avoiding such consent. Consider starting another independent acquisition if a different consent response must be compared.
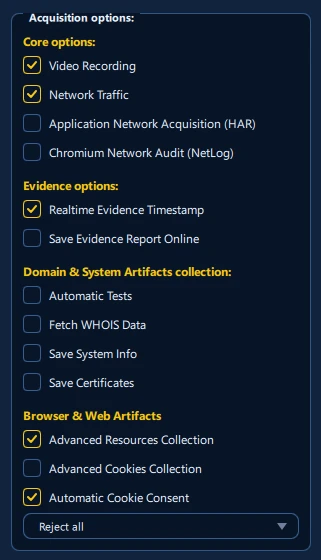
7.2.2 Core, Evidence, and Artifact Options
The web acquisition dialog groups individual collection settings by purpose. Each enabled option influences captured material, the session metadata, and potentially the final acquisition archive size. Disabled controls should not be interpreted as proof that the underlying information never existed: they indicate a feature was not selected for the session.
| Control | Effect and recommended use |
|---|---|
| Video Recording | Record investigator interaction with the acquisition browser, when supported. |
| Network Traffic | Collect packet-level traffic (PCAPNG) using supported host capture components. |
| Application Network Acquisition (HAR) | Collect browser-observed HTTP request/response artifacts; distinct from host PCAP. |
| Chromium Network Audit (NetLog) | Record Chromium network diagnostic events and timing information. |
| Realtime Evidence Timestamp | Request external timestamps for individual finalized evidence summaries. |
| Save Evidence Report Online | Publish eligible evidence reports to the configured online service, subject to policy. |
| Automatic Tests / Fetch WHOIS | Collect enabled diagnostic or registration-related technical context. |
| Save System Info / Save Certificates | Record system context or certificate environment artifacts. |
| Advanced Resources Collection | Preserve additional observed web resources when supported. |
| Advanced Cookies Collection | Collect detailed cookie metadata and lifecycle observations. |
| Automatic Cookie Consent | Attempt supported Accept all / Reject all actions and log actual clicks. |
Important distinction: Evidence reports may be generated locally even if Save Evidence Report Online is disabled. Online saving is a separate option. Realtime timestamping is configured separately from acquisition finalization timestamping.
7.2.3 Mail Acquisition (Beta): POP3 and IMAP
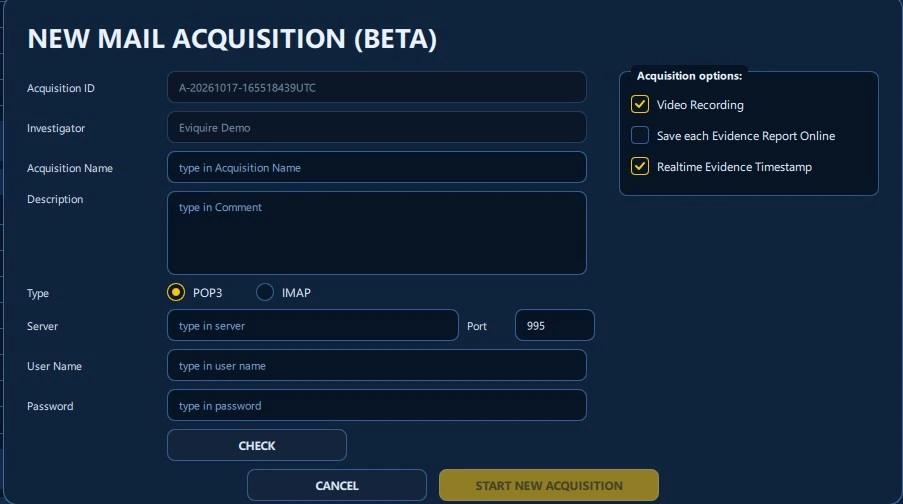
Select New Mail Acquisition from the selected case. In the mail dialog, confirm the generated Acquisition ID and Investigator, enter a meaningful Acquisition Name and Description, then choose POP3 or IMAP. Supply the authorized Server, Port, User Name, and Password; use CHECK to validate connectivity or account details before starting the acquisition.
The illustrated example selects POP3 and shows port 995. The actual port and encryption requirements depend on the mail server. Mail acquisitions provide optional Video Recording, Save each Evidence Report Online, and Realtime Evidence Timestamp settings. Protect mailbox credentials and scope collection to the authorized account and messages.
7.2.4 Android Mobile Live Acquisition (Beta)
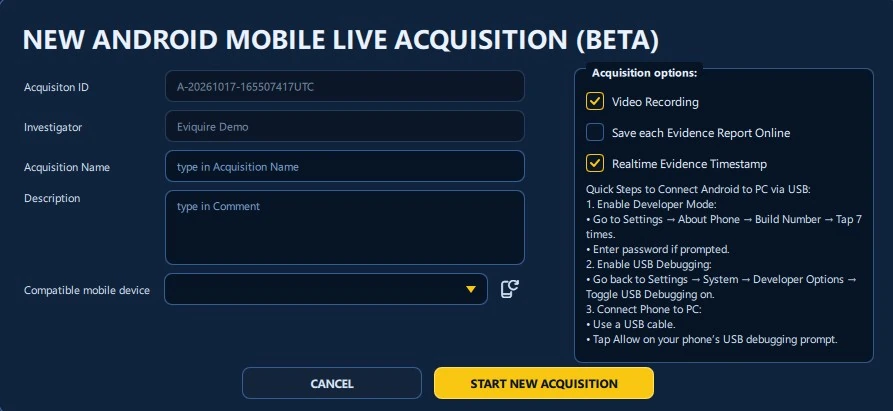
Select Live Mobile Acquisition and verify the case context, generated Acquisition ID, investigator, name, and description. On the Android device, enable Developer Options (commonly by tapping Build Number seven times), then enable USB Debugging. Connect the phone to the workstation using USB and accept the device’s debugging authorization prompt.
Choose the phone in Compatible mobile device. Use the device refresh control if it is not listed. This beta workflow provides Video Recording, Save each Evidence Report Online, and Realtime Evidence Timestamp. Device compatibility, operating-system permissions, and USB debugging policies can differ between devices; test the supported capture path before live casework.
Mobile safety: Enabling USB debugging changes device trust and access settings. Record authorization and device identifiers and restore device settings according to your approved operating procedure after acquisition.
7.3 Investigator Metadata
Before capture, confirm:
- Investigator name.
- Acquisition name.
- Acquisition comment.
- Case ID.
- Acquisition type.
- Expected target URLs or accounts.
- Language or content settings.
This metadata appears in reports and summary files. Accurate metadata supports later review and testimony.
7.4 Browser Launch
When the acquisition begins, Eviquire launches the forensic browser process and passes session information through environment variables. The browser initializes storage, database, chain-of-custody logging, profile paths, network logging, SSL key logging, request interception, and acquisition UI. The browser is isolated from the manager process so the live acquisition can run as a dedicated session. When the browser exits, the manager packages the results.
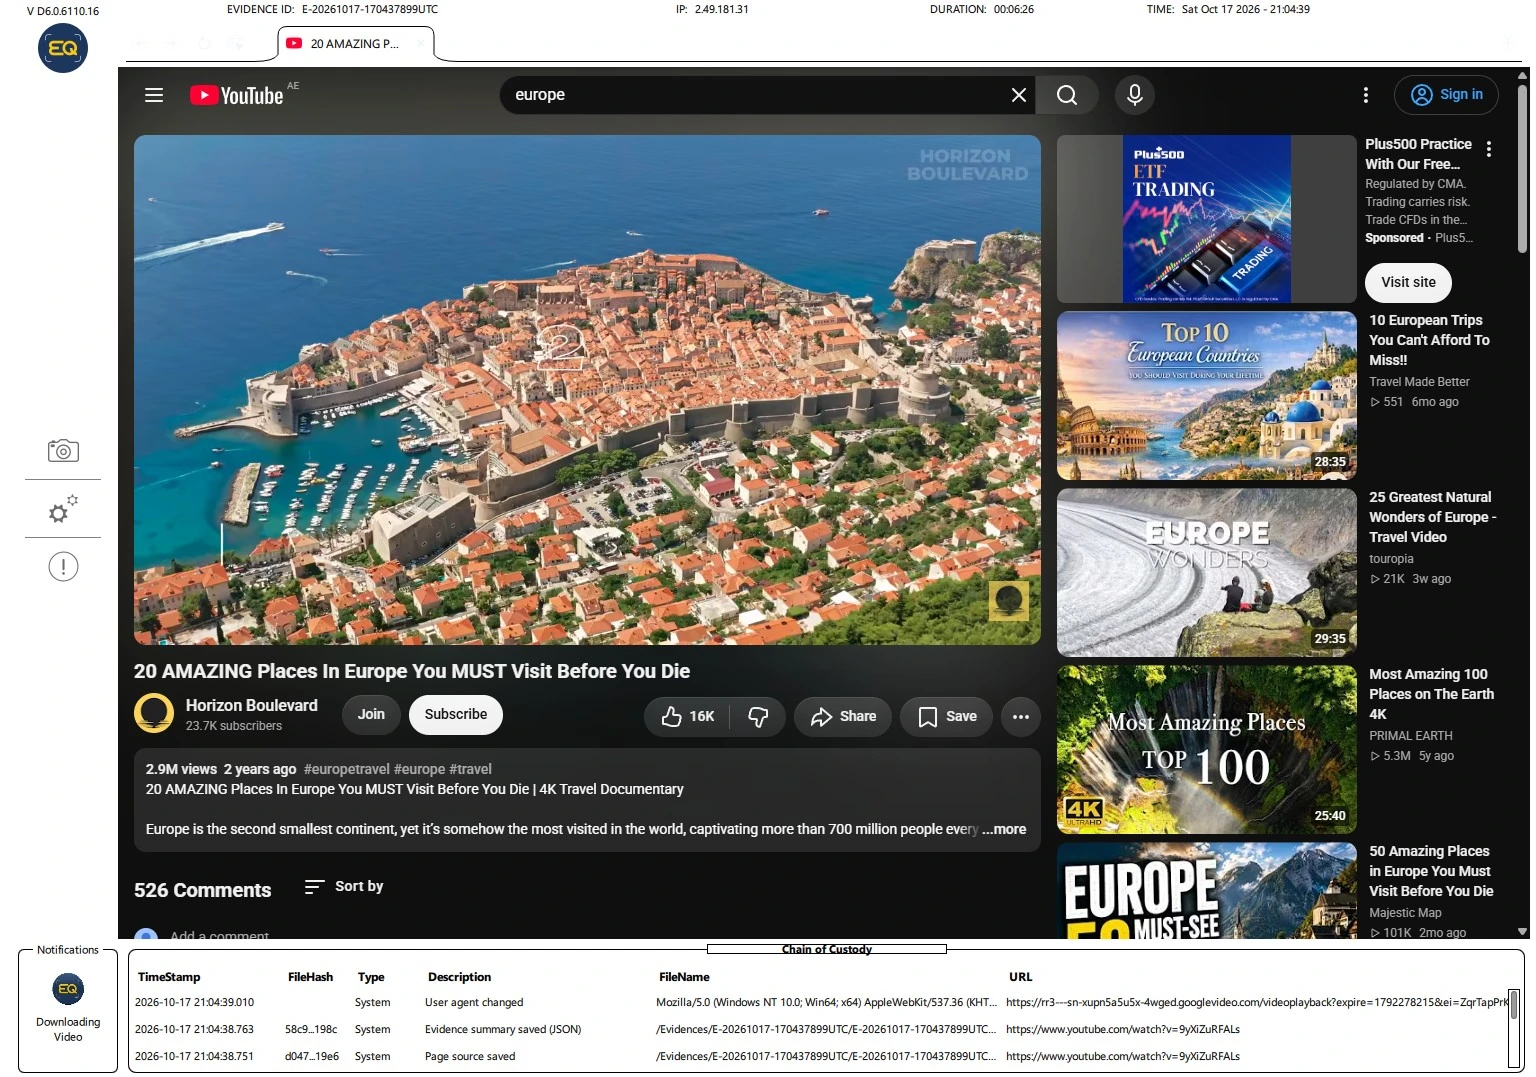
The forensic browser displays software version, Acquisition ID or Evidence ID, public exit IP, elapsed duration, and a time display across the top. Use the acquisition tools on the left and the expandable Chain of Custody footer to follow evidence production, navigation, download activity, and operational messages.
The example shows a downloaded-video notification in the acquisition workspace. The visible page and session recording provide context, while the evidence package and logs remain the authoritative preserved files. Displayed times may follow an investigator-selected GMT offset; UTC records are retained for the forensic event timeline.
7.5 Capture Settings
Capture settings determine which artifacts are collected. Common settings include:
- Video recording.
- Network traffic capture.
- Application Network Acquisition (HAR).
- Chromium Network Audit (NetLog).
- Realtime Evidence Timestamp.
- Save each evidence report online.
- Automatic cookie consent handling and browser cookie collection.
- Automatic tests.
- WHOIS lookup.
- System information.
- Certificates.
- Deep collection.
- Content language.
- DNS-over-HTTPS settings.
- Proxy or Tor routing.
Use the minimum settings that satisfy the investigative requirement. Extra artifacts can improve context, but they can also increase package size and sensitivity.
7.6 Network Logging
Network logging captures traffic generated during the session into a PCAPNG file where supported. This can be valuable for showing server connections, redirects, downloads, requests, and related communication. Before enabling network capture:
- Confirm TShark is installed and detected.
- Confirm permissions are sufficient.
- Close unrelated applications.
- Consider using a dedicated VM.
- Warn investigators that credentials may appear in traffic or decrypted logs.
Warning: Network capture may include traffic from the entire host, not only the Eviquire browser. If other applications are open, their traffic may be included. This can introduce privacy, privilege, and scope issues.
7.6.1 Choosing PCAPNG, HAR, and Chromium NetLog
These options serve different forensic purposes and are not interchangeable:
| Artifact | Capture level | Especially useful for | Important limitations |
|---|---|---|---|
| Network Traffic (PCAPNG) | Packets seen at the capture interface | Endpoints, timings, network flows, packet-level examination | Can include unrelated system traffic; HTTPS content may remain encrypted unless suitable keys exist. |
| Application Network Acquisition (HAR) | Browser HTTP request/response transactions | Headers, methods, status, redirects, requested resources, and timing | HAR is not packet capture and does not ordinarily provide comprehensive DNS-resolution telemetry. Sensitive headers and tokens may be present. |
| Chromium Network Audit (NetLog) | Chromium internal network event log | Browser networking behavior, DNS/resolver events when logged, proxy behavior, connection diagnostics | Browser-specific diagnostic format; event coverage depends on configuration and browser version. |
Capture more than one format when technically justified. Record which options were enabled and verify that the expected files are present after closure. If DNS visibility is a principal objective, evaluate the actual resolver and browser log outputs; do not assume DNS transactions will appear in a HAR file.
7.6.2 HAR and Chromium NetLog (Version 6)
HAR captures browser-observed HTTP requests, responses, timing, headers, and supported response bodies, with a dedicated viewer offering filters, sorting, and raw-response downloads. It is especially useful for analyzing dynamic web applications and API calls without requiring the investigator to inspect packet-level traffic.
Chromium NetLog captures the browser networking stack’s diagnostic events. It can help explain network connection, DNS, cache, proxy, and timing behavior. NetLog is not an interchangeable substitute for full HAR bodies or host packet capture; evidence contents depend on the enabled capture mode.
Output Primary perspective Principal handling consideration
Packets observed by the host capture May include unrelated system traffic; PCAPNG engine depends on host tools/permissions.
HAR Application-level HTTP May include authenticated headers, request/response context cookies, tokens, and response bodies.
Chromium network diagnostics and May expose URL, DNS, proxy, and NetLog browser internals sensitive network metadata.
Privacy: Enable these outputs selectively. HAR, NetLog, PCAPNG, TLS key logs, and advanced cookies can each expose session data or credentials.
7.7 Proxy And Tor Settings
Proxy and Tor settings route acquisition traffic through a configured network path. This can be useful for geographic testing, anonymity requirements, or controlled routing. Before using a proxy or Tor:
- Confirm legal authority permits the routing method.
- Confirm exit country and public IP.
- Record the proxy configuration.
- Verify the target content is reachable.
- Understand that different routing can change page content.
Eviquire records exit country and public IP events when available, and acquisition metadata includes public IP, country, and proxy IP.
7.8 DNS Over HTTPS
DNS-over-HTTPS settings control how the forensic browser resolves domain names. Available modes may include system DNS, secure-only, or secure-with-fallback, depending on platform support. DNS settings matter because DNS resolution can influence what content is reached. If non-default DNS-over-HTTPS is used, document the mode and server templates.
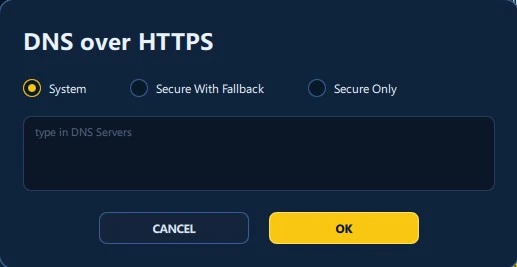
Click DoH Settings from the New Acquisition dialog to choose how the browser resolves names. System uses the configured system-resolution behavior; Secure With Fallback prefers configured secure DNS with a fallback path; Secure Only requires secure resolution, which may cause sites to fail to load if the chosen resolver is unavailable.
Enter the DNS server details appropriate to the selected secure mode. Preserve the chosen DNS settings as acquisition context and test resolution before collecting time-sensitive evidence, particularly when routing through a proxy or Tor.
7.9 Video Recording
Video recording captures the acquisition session visually. This can help show investigator actions, page interactions, menus, scrolling, downloads, and evidence capture timing. When enabled, Eviquire starts a recorder and logs recording start and end events. Video duration is stored in acquisition metadata. On some Linux desktop environments, video capture may require X11 rather than Wayland. Caution: Video recording may capture sensitive information visible on screen, including credentials, unrelated windows, notifications, or personal data. Prepare the workstation before capture.
7.10 Automatic Screenshots
Automatic screenshots may be available as part of acquisition or testing flows. Use them when the workflow requires regular visual preservation without manual intervention. Confirm the resulting image count and disk usage during long sessions.
7.11 Deep Collection Mode
Deep collection is intended to collect additional technical artifacts, such as request/response data or expanded page material, depending on configuration. It can improve technical analysis but can also increase case size and sensitivity. Use deep collection when:
- You need request/response context.
- You expect dynamic content.
- You need more than a static screenshot.
- You are prepared to review larger technical artifacts.