
User manual · Chapter 4
Getting Started
Learn the Eviquire Case Manager layout, navigation, cases, acquisitions, evidence viewer, reports, and settings.
4.1 Overview Of The Interface
Eviquire is organized around the investigative workflow:
- Create or open a case.
- Start an acquisition.
- Capture evidence.
- Review evidence.
- Finalize the acquisition.
- Close and export the case.
The interface presents case records, acquisition records, evidence records, reports, and configuration settings. The application separates the case manager from the forensic browser. The manager organizes cases and starts acquisitions. The browser performs the live acquisition and records session artifacts.
4.2 Case Manager Dashboard — Three-Level Layout
The Case Manager is the primary desktop workspace. The current interface presents the investigation hierarchy on the left and a context-sensitive Details pane on the right. Selecting an item changes the details shown on the right without switching away from the Case Manager.
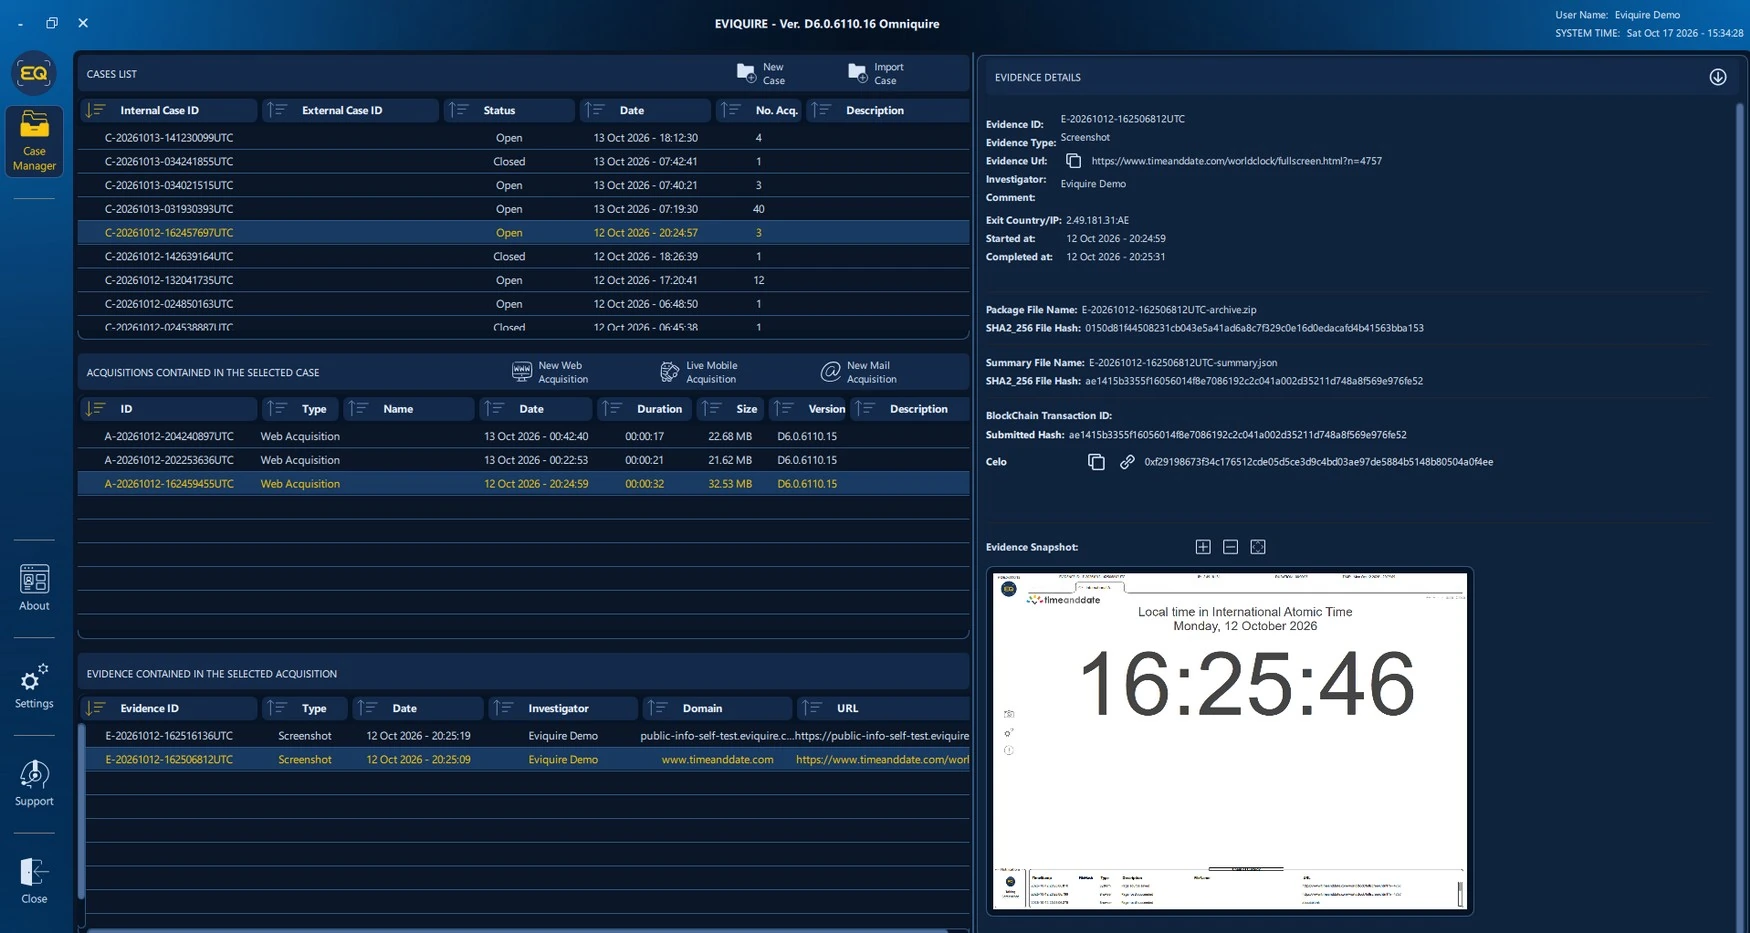
The left-side workspace has three lists:
- CASES LIST — all cases, with columns Internal Case ID, External Case ID, Status, Date, No. Acq., and Description.
- ACQUISITIONS CONTAINED IN THE SELECTED CASE — acquisitions associated with the selected case, showing ID, Type, Name, Date, Duration, Size, Version, and Description. This band also provides New Web Acquisition, Live Mobile Acquisition, and New Mail Acquisition actions.
- EVIDENCE CONTAINED IN THE SELECTED ACQUISITION — individual evidence records, with Evidence ID, Type, Date, Investigator, Domain, and URL.
The right panel changes according to whether a case, acquisition, or evidence item is selected. See the dedicated sections below for each detail view. Typical dashboard tasks include:
- Creating a new case.
- Selecting an existing case.
- Reviewing acquisitions in a case.
- Opening an acquisition for review.
- Starting a new acquisition.
- Closing a case.
- Importing or exporting case packages.
- Adjusting application settings.
4.3 Left Navigation Sidebar
The icon rail is displayed on the left side of the Case Manager. The screenshots show Case Manager, About, Settings, Support, and Close. The Case Manager entry opens the three-level investigation workspace. About provides product information, Settings opens application configuration, Support opens the support workflow, and Close exits the application.
At the top of the Case Manager, the application displays its version. The upper-right corner shows User Name and SYSTEM TIME. Distinguish that displayed system time from UTC-formatted case, acquisition, and evidence identifiers and chain-of-custody records.
Case list controls: New Case and Import Case appear above the case table. Action icons also appear inside the details pane for the selected object. Use the icon tooltip and confirmation dialog before performing destructive or irreversible operations.
4.3.1 Working Through the Lists
To reach a captured item, first select a case, then select one of its acquisitions, and finally select an evidence row. A selected row is highlighted; related information is refreshed in the adjacent tables and on the right. Sort controls are visible in table headers. Some tables can be scrolled horizontally when the window is narrow.
Example: Select a case with three acquisitions, choose a web acquisition from the middle list, then choose a screenshot in the lower list. The Evidence Details panel then displays its evidence ID, source URL, timestamps, integrity fields, and preview.
Do not confuse selection with export: Clicking a row shows metadata. Download, review, and export actions are separate operations shown through toolbar icons and detail views.
4.4 Cases
Cases are the highest-level investigative units. A case should represent a matter, investigation, incident, legal request, or compliance review. A case may contain one acquisition or many acquisitions. Use one case when the evidence belongs to the same matter and should be exported together. Use separate cases when legal authority, subject matter, retention requirement, or disclosure scope differs.
4.5 Acquisitions
An acquisition is one collection session. It has a start time, end time, acquisition type, investigator, options, browser/network context, and evidence list. Use separate acquisitions when:
- Evidence is collected at different times.
- Different proxy, Tor, DNS, or network settings are used.
- Different investigators perform collection.
- Different target systems or accounts are involved.
- A clean separation is required for legal or reporting purposes.
4.6 Evidence Viewer
The evidence viewer allows users to inspect captured evidence. Depending on the evidence type, the viewer may show screenshots, reports, source files, downloads, mail content, logs, metadata, and package information. The viewer is designed for review and validation. It should not be treated as a substitute for the original evidence package. The package and its hashes remain the authoritative forensic deliverable.
4.7 Reports
Eviquire produces reports at three levels:
- Evidence reports describe one evidence item.
- Acquisition reports describe one acquisition session.
- Case reports describe the whole case.
PDF reports are intended for human review. JSON reports are intended for structured validation, ingestion, or technical review.
4.8 Settings
Settings control data location, capture behavior, proxy settings, Tor, DNS-over-HTTPS, video recording, network capture, logging, report branding, language, update behavior, and automation where available.
Investigator Tip: Review settings before each operational acquisition. A prior case may have used a proxy, Tor, DNS-over-HTTPS, or batch capture configuration that should not be reused unintentionally.