
Quick start · Six-step workflow
Eviquire Quick Start Guide
Complete your first forensic web evidence acquisition in Eviquire: prepare the workstation, create a case, capture, review, verify, and export.
Your first forensic web evidence acquisition: Create → Capture → Review → Verify → Export.
Designed for investigators who need to preserve online evidence with documented collection steps, integrity information and a structured case package.
This field guide for Release 6 covers Eviquire Desktop v6.0.6110.18. The PDF edition is dated 17 October 2026. Interface screenshots show build D6.0.6110.16. Appearance and available options may vary by operating system, build and license.
The six main steps are: create a case, start acquisition, capture evidence, review, verify, and close & export. Pageshot is an optional addition.
Before you start: Prepare the workstation
A short preparation check helps preserve the acquisition context and prevents avoidable capture failures.
Install or launch Eviquire
- Obtain the approved package from www.eviquire.com: Windows installer or portable ZIP; compatible Ubuntu AppImage; or an authorized macOS beta build.
- Install the application, or extract and run the portable package. Launch Eviquire and sign in using your registered credentials or organization-approved activation method.
- Confirm the correct investigator profile, application version, writable evidence-storage location, available disk space and system time.
Network capture note: PCAPNG capture requires supported host packet-capture components and permissions (for example TShark/dumpcap). A portable Eviquire package does not install host capture permissions.
Understand the evidence structure
| Case | Acquisition | Evidence |
|---|---|---|
| The investigation container. A case can contain multiple acquisition sessions. | One recorded collection session, with its options, logs and artifacts. | An individual screenshot, pageshot, source capture, download or other captured item. |
First-run checklist
- Confirm you are authorized to access and collect the target web content.
- Use a stable connection and adequate writable storage; avoid unrelated browsing or applications.
- Set a clear case reference and meaningful acquisition name.
- Decide in advance whether you need video, PCAPNG/HAR, cookie collection or other sensitive artifacts.
Start simple: For your first practice case, capture a page you are authorized to use. A screenshot plus a local report and acquisition Chain of Custody demonstrates the basic workflow without requiring every advanced option.
Time stamps and admissibility
Eviquire records acquisition activity and integrity metadata. A recorded hash or timestamp supports evidence preservation; it does not independently establish the truth, authorship or legal admissibility of web content.
For detailed setup guidance, see system requirements and installation.
Step 1: Create your first case
Case Manager. The case is the outer container for all evidence collected for the same investigation.
- Select Case Manager in the left navigation, then choose New Case.
- In NEW CASE CREATION, review the generated Internal Case ID and enter a descriptive Internal Case Name and a short, factual Description.
- Add External Case ID / External Case Name if your organization uses an incident or matter reference. Leave Advanced bulk options off for a standard first case.
- Select CREATE NEW CASE. Confirm the new record appears in the CASES LIST.
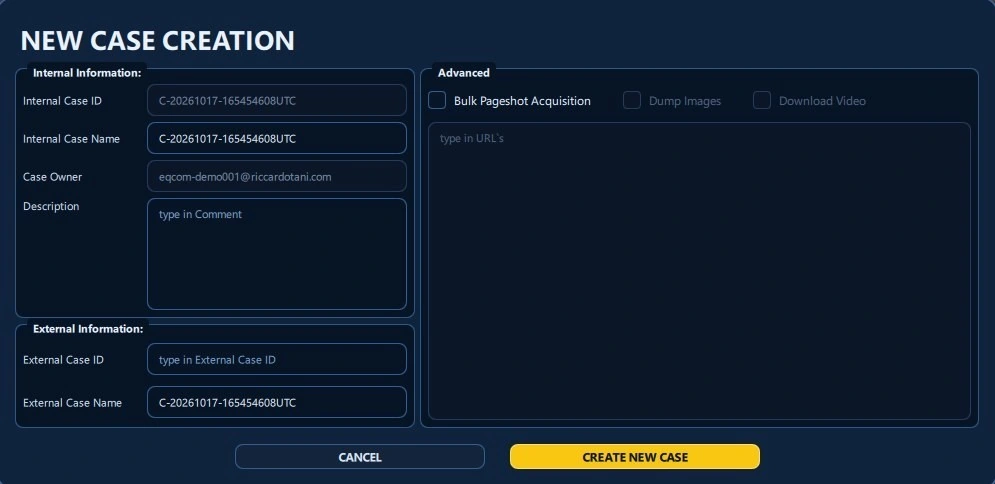
What you should see
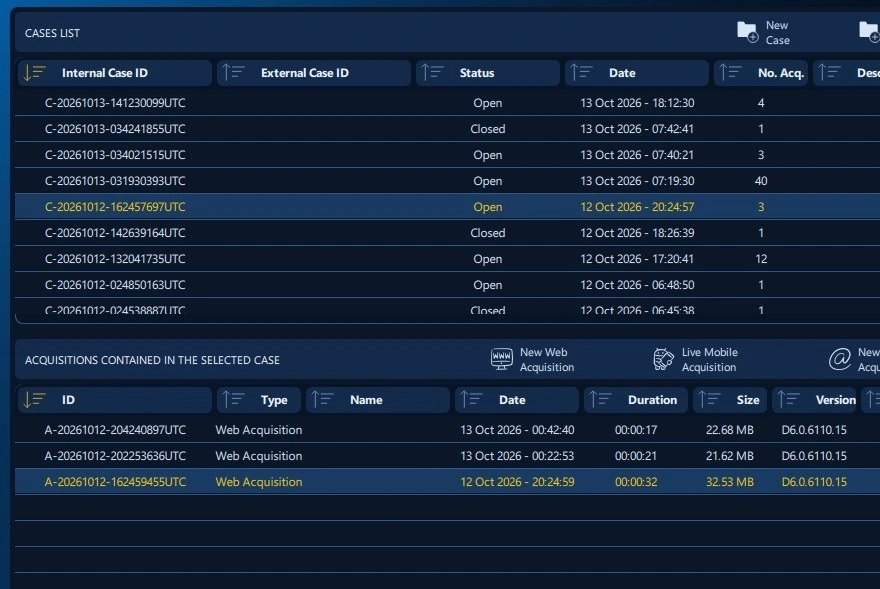
More detail: case management.
Step 2: Configure an acquisition
Web acquisition. Each acquisition is a separate, time-bounded collection session within the selected case.
- Select your case. In ACQUISITIONS CONTAINED IN THE SELECTED CASE, choose New Web Acquisition.
- Enter an Acquisition Name, verify the Investigator and add a factual Description. Check Browser user agent, Proxy, TOR Proxy, Content Language and DoH Settings only as needed for the investigation.
- Review the Acquisition options on the right. Enable only collection methods your case requires; then choose START NEW ACQUISITION.
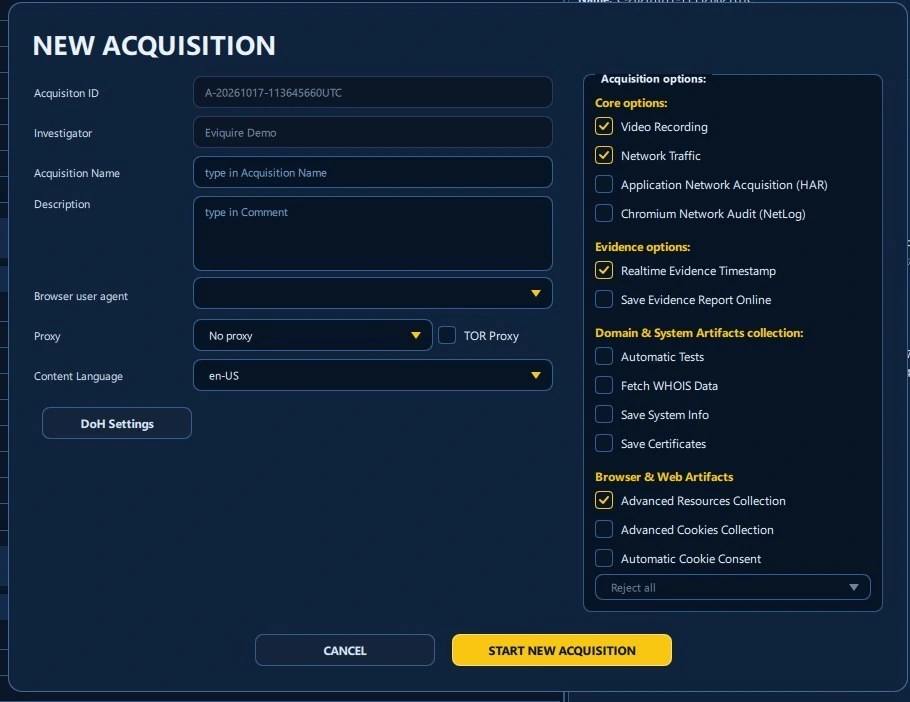
Settings you are most likely to use
| Setting | What it does |
|---|---|
| Video Recording | Records session actions; generates a larger and potentially sensitive acquisition package. |
| Network Traffic / HAR | PCAPNG captures host packets when configured. HAR captures browser-observed HTTP activity; they are different artifacts. |
| Realtime Evidence Timestamp | Requests external timestamps for eligible finalized evidence integrity records when enabled. |
| Automatic Cookie Consent | Optional; select Reject all or Accept all when applicable. Only actual interactions are reflected in Chain of Custody. |
Important: Local PDF/JSON evidence reports can be created even when “Save Evidence Report Online” is not selected. Online reporting is a separate choice.
More detail: acquisition workflow and options.
Step 3: Capture your first screenshot
Forensic browser. Use the forensic browser rather than an external browser so the image is linked to the acquisition records.
- Wait for the Eviquire forensic browser to launch, then navigate to the target URL.
- Allow the page to load and verify the page, URL and visible content. If relevant, document any login, consent or other interaction.
- Select the camera icon in the left toolbar to open the capture menu. Choose Screenshot to preserve the current visible state.
- Wait for confirmation that the screenshot was saved. Repeat for any additional relevant on-screen state.
Capture menu
- Screenshot — visible browser state.
- Manual Region — selected portion of the page.
- Pageshot — extended page capture.
- Autoscroll Page — guided page traversal.
- Autoscroll Element — a detected scrollable region, when available.
- Web Crawler / Download Video — supported advanced workflows.
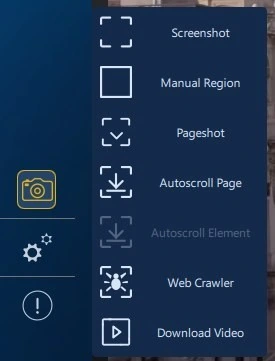
What gets preserved?
A screenshot evidence item may include a PNG, supporting page/source context, report and summary JSON, relevant hashes and Chain-of-Custody entries when finalized. The exact package contents depend on enabled options and collection results.
Forensic practice: Capture surrounding context before taking a narrow region screenshot. Avoid editing the original files, and do not treat an image alone as the complete forensic record.
More detail: evidence capture types.
Optional: Preserve a long or dynamic page
Use Pageshot or Autoscroll when the relevant material extends beyond one visible screen.
- Navigate to the target page and wait for it to stabilize. Open the camera menu and choose Pageshot or an applicable Autoscroll command.
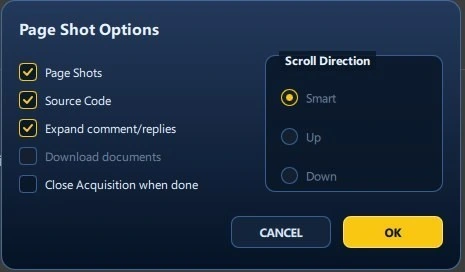
- In Page Shot Options, choose Page Shots for visual frames and Source Code for associated page source, where appropriate.
- For supported social platforms, Expand comment/replies may collect additional visible discussion context. Select Smart scroll direction unless a specific direction is required.
- Confirm with OK. Avoid changing tabs or interacting with the page while automatic scrolling and capture are in progress.
Which capture is right for the task?
| Capture | When to use it |
|---|---|
| Screenshot | A fast record of the visible page state at a particular moment. |
| Pageshot | A sequence of frames preserving a long page beyond the current viewport. |
| Autoscroll Element | Capture a detected scrollable panel, such as a comments list, when available. |
Understand the limitations
On dynamic sites, content can move, disappear or load during scrolling. Automatic comment expansion and consent handling depend on supported website structures; neither guarantees a complete copy of all available content. Consult the acquisition logs when describing what was actually captured.
Quick check: If you are testing your first acquisition, capturing one screenshot is sufficient to proceed to review. Pageshot and comment expansion are optional additions, not prerequisites.
More detail: full-page capture and autoscroll.
Step 4: Inspect your acquisition
Review. After collection, end the acquisition through the application and wait for finalization before inspecting its records.
- End the browser acquisition using the application’s normal close/finish workflow. Allow media, reports, hashes and archives to finish writing.
- In Case Manager, select the case and acquisition. Check the acquisitions table for the session and the evidence table for captured items.
- Open Acquisition Review for the selected session. Choose EVIDENCES to select an evidence item and preview its files; use SCREENSHOTS for rapid visual review.
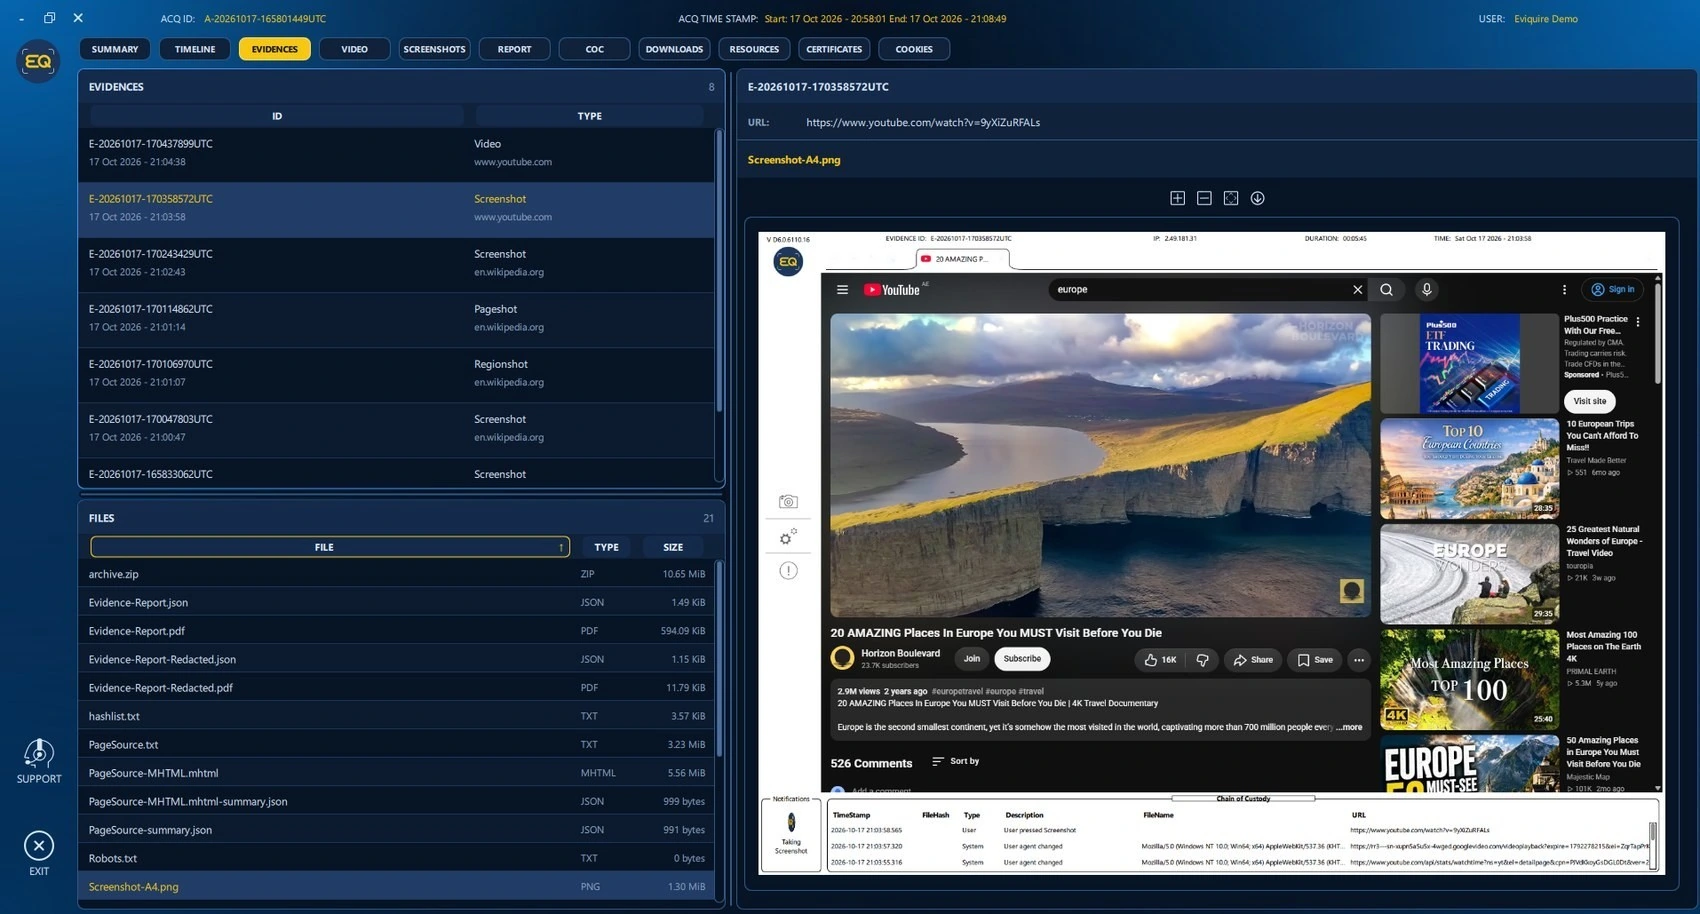
Where to look next
| Tab | What to review |
|---|---|
| SUMMARY | Browse the acquisition archive, including reports, source files, hashes and network artifacts. |
| COC / TIMELINE | Inspect timestamped user/system actions and the sequence of selected evidence, video, cookie and TLS events. |
| REPORT | Read the acquisition PDF, including case linkage, investigator, acquisition settings and package integrity fields. |
Remember: The viewer shows read-only previews. Original evidence packages, summaries and recorded hashes remain the primary forensic deliverables.
More detail: reviewing evidence and the Acquisition Review Tool.
Step 5: Verify before delivery
Integrity. Use the built-in integrity checks to identify missing or changed files before closing the case.
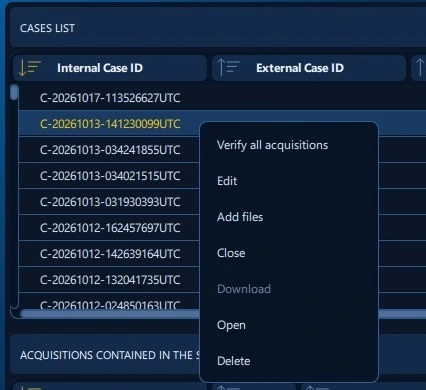
- In Case Manager, right-click the case row and select Verify all acquisitions.
- Wait for checks to finish. Review acquisition statuses and use the information button to inspect the detailed file findings for each session.
- If a result indicates a mismatch or missing file, preserve the original material, review the record and investigate before relying on the package.
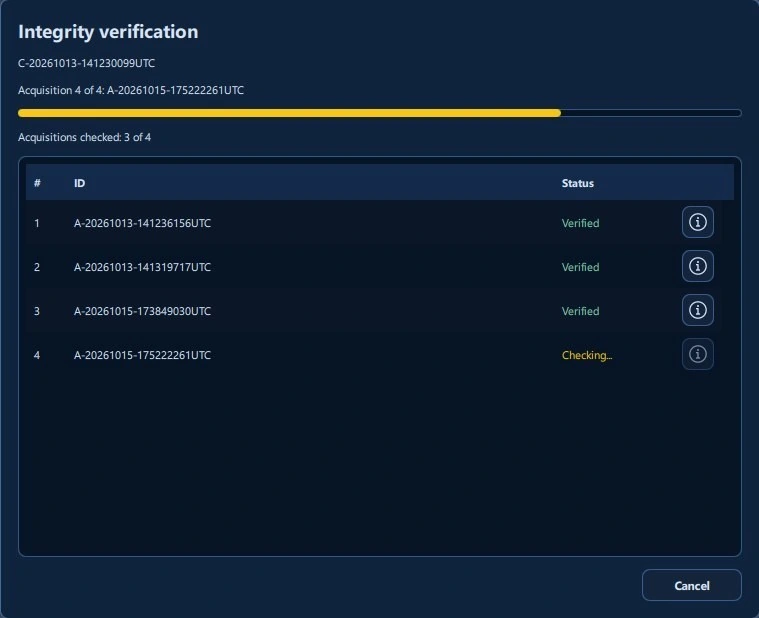
Reading a verification result
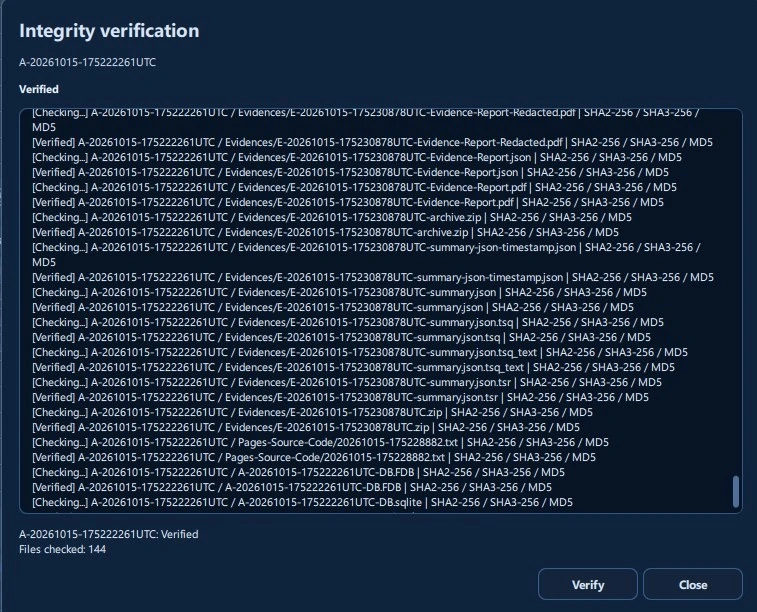
What verification means: A successful built-in hash check supports file integrity; it does not prove the truth of the source content or independently validate every external timestamp or blockchain receipt.
More detail: integrity and verification.
Step 6: Close, export and preserve
Finalize. Complete the case only after all intended acquisitions and evidence have been reviewed.
- Confirm the case includes all intended acquisitions. In Case Manager, right-click the case and select Close.
- In CLOSE THE CASE, choose an export Password if required by your workflow. Select Save Report Online or Add Viewer only when needed and authorized.
- Select CLOSE THE CASE. Wait for compression, reports, hashes and final packaging to complete; do not interrupt storage or shut down the workstation.
- Locate the exported case ZIP and record its SHA-256 using an approved verification tool. Transfer a copy using an approved secure method; deliver any password separately.
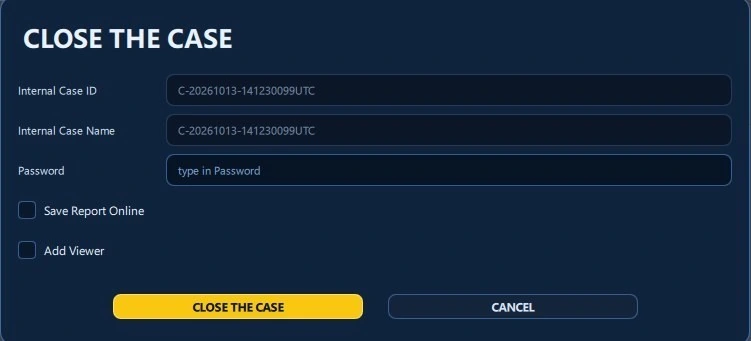
Important: Closed Eviquire cases cannot be reopened for editing. Preserve the closed original and create a separate supplemental case if further collection is required.
First acquisition — completion check
- Case ID, acquisition ID and investigator are correct.
- The intended screenshot or other evidence appears in the evidence list.
- The acquisition report and Chain of Custody are available.
- Integrity verification was completed and exceptions were documented.
- The final ZIP was preserved, its export hash was recorded, and access is controlled.
More detail: exporting and deliverables.
Need assistance?
A product of Ricta Technologies Srl. Product: Eviquire.
- Technical support: [email protected].
- Help Center: help.eviquire.com.
- Product website: www.eviquire.com.
- Developer: www.ricta.io.
When contacting support, provide the application version, operating system, affected workflow and relevant error details. Do not send original evidence, credentials, cookies or TLS secrets unless explicitly authorized and securely transferred.
© 2026 Ricta Technologies Srl.