
User manual · Chapter 6
Case Management
Create and manage Eviquire cases, attach supporting files, document investigators and notes, close cases, and export case packages.
6.1 Creating A Case
Create a case before collecting evidence. A case should represent one investigative matter or legal scope. Procedure:
- Open Eviquire.
- Navigate to the case manager.
- Select New Case.
- Enter case metadata such as description, owner, investigator, matter name, or internal reference.
- Confirm the case details.
- Save the case.
Eviquire creates the case folder and case database as needed. The case receives a stable case ID, normally beginning with C-.
Investigator Tip: Use a case name or description that is meaningful but does not expose unnecessary sensitive information if the package name or folder path is later viewed by third parties.
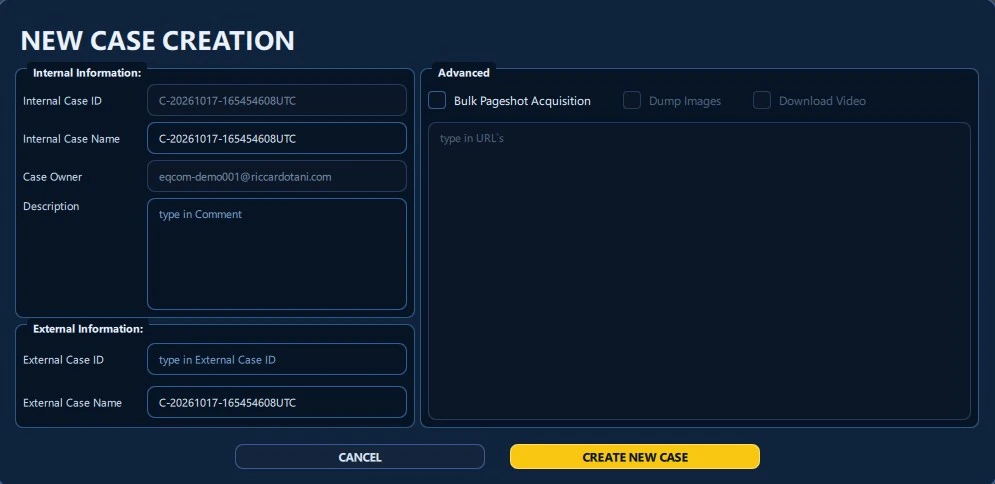
The NEW CASE CREATION dialog separates Internal Information, External Information, and Advanced batch-capture controls. The Internal Case ID and default case name are generated by Eviquire. The Case Owner field identifies the current owner account; Description holds the investigation context.
Where applicable, External Case ID and External Case Name allow Eviquire to be linked to the reference scheme used by the investigating organization, court, or evidence-management system. These references do not replace Eviquire’s internal case identifier. The Advanced area includes Bulk Pageshot Acquisition, optional Dump Images and Download Video selections, and a field for multiple target URLs. Enter only investigation-authorized targets; automated collection must remain within the applicable collection scope.
Tip: Populate meaningful external references before the first acquisition, and verify every URL supplied to a bulk operation. A long URL list can increase storage requirements and collection time considerably.
6.1.1 Internal and External Case IDs
Eviquire assigns an Internal Case ID, normally beginning with C- and ending in UTC. The External Case ID is a separate field used to associate the Eviquire record with the organization’s investigation, incident, or matter tracking system. These identifiers may be identical in a demonstration case, but they serve different purposes. Where available, enter a meaningful external reference without changing the generated internal identifier.
The Status field identifies whether a case is open or closed. The No. Acq. field displays how many acquisition records belong to that case. The Date and Description columns make the case recognizable in the list.
6.2 Editing Case Metadata
Case metadata may include description, owner, state, notes, or workflow fields depending on edition. Update metadata when the scope or administrative details change. Procedure:
- Select the case.
- Open the case details view.
- Edit the relevant fields.
- Save changes.
- Confirm the updated case information.
Changes to case metadata should be consistent with internal evidence-handling policy. If a change affects legal scope or collection authority, document that separately.
6.2.1 Case Details Panel
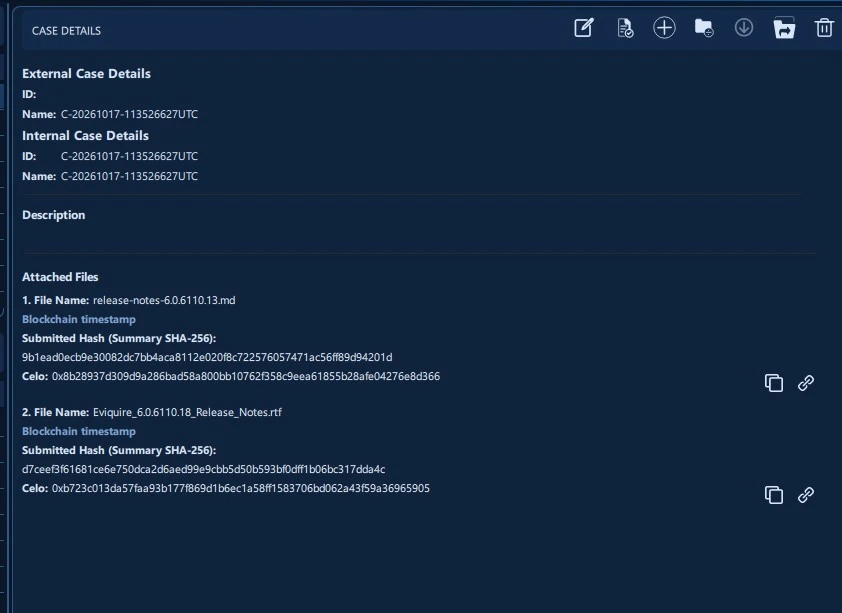
Select a case in the CASES LIST to display CASE DETAILS in the right panel. The illustrated panel separates External Case Details and Internal Case Details, followed by Description and Attached Files. The case-level toolbar contains edit, document/report, add, file, download/export, and delete-style icons; action availability can depend on case state. Read the tooltip and application confirmation before selecting an icon.
6.3 Assigning Investigators
Investigator identity may be set in the user profile, case, or acquisition form depending on workflow. The investigator name is included in evidence summaries and chain-of-custody context. Before starting an acquisition:
- Confirm the active user profile.
- Confirm investigator name and surname.
- Confirm license or account identity if applicable.
- Confirm the correct case is selected.
If multiple investigators work on a case, use separate acquisitions for each investigator or document role changes carefully.
6.3.1 Adding Supporting Files to a Case
Version 6 provides a dedicated FILES tab within the EDIT CASE dialog. It permits investigators to attach relevant supporting documents to the case, such as authorization records, investigator notes, scope documentation, or third-party references. These attachments are distinct from evidence captured during an acquisition.
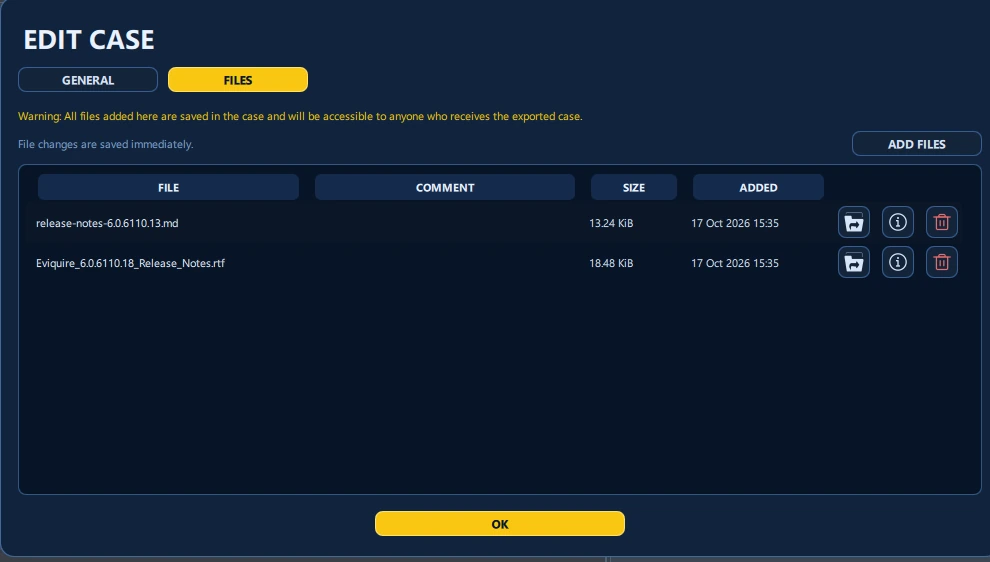
Procedure — attach a file to a case
- Select the open case in CASES LIST.
- Open the case editing action from the CASE DETAILS toolbar.
- Choose the FILES tab, then select ADD FILES.
- Select the intended local file or files. Review the filename, size, and addition time in the list.
- Use the available file-row controls to access the attachment, view information, or remove it where permitted. Add an explanatory comment where supported.
- Select OK to leave the dialog.
- Return to CASE DETAILS and review the Attached Files section.
Important information displayed by the product: File changes are saved immediately. The dialog warns that all files added here are saved in the case and will be accessible to anyone who receives the exported case. Do not attach privileged or unrelated material without assessing export and disclosure scope.
For each file, the case Details pane can display a Blockchain timestamp section containing a Submitted Hash (Summary SHA-256) and a Celo transaction identifier. Copy and link icons provide a way to reference the recorded transaction. These integrity fields relate to the attachment’s recorded summary and anchoring; they do not mean that the full attachment content is publicly stored on the blockchain.
Attachment versus evidence: A case attachment is contextual material introduced by the investigator. An evidence item is an acquisition output with its own evidence ID and capture record. Keep these categories distinct in reports and disclosures.
6.4 Notes
Use notes to document investigative context that is not automatically captured:
- Legal authority or consent reference.
- Target account or URL list.
- Time-sensitive conditions.
- Authentication steps performed before capture.
- Known limitations.
- External tools used.
- Deviations from standard procedure. Notes do not replace Eviquire’s chain-of-custody logs. They complement them.
6.5 Case Classification (Where Available)
Some deployments may expose classification fields or tags. If available in your edition, use them to classify cases and evidence. Example tags include:
- Fraud.
- Phishing.
- Marketplace.
- Internal investigation.
- Regulatory.
- Urgent.
- Privileged.
- Contains PII.
Tags improve triage and review but should not be used as the only description of evidence.
6.5.1 Case Context Menu
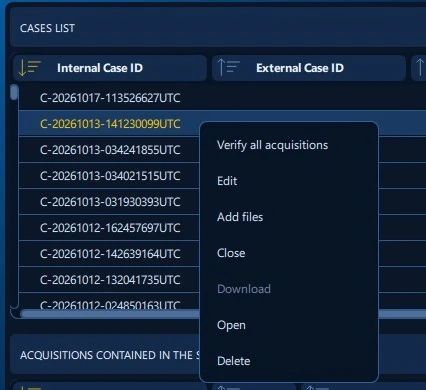
Right-click a case row to access available case actions. Verify all acquisitions launches the integrity-verification interface; Edit opens case metadata; Add files attaches supporting material; Close opens final case packaging; Open displays or enters the selected case. Download may be unavailable until the case has an appropriate finalized package.
Caution: Deletion removes access to case records according to the application workflow; follow retention, legal-hold, and authorization rules before using a destructive action.
6.6 Closing A Case
Close a case when collection and review are complete and the case is ready for final packaging. Procedure:
- Select the case.
- Confirm all acquisitions are finalized.
- Confirm all evidence items are present.
- Confirm reports are generated.
- Select Close Case.
- Choose whether to add a viewer package, if supported.
- Enter an export password if required.
- Start closure.
- Wait for hashing, compression, reporting, timestamping, and final packaging to complete.
- Confirm the final case ZIP was created.
Closing a case creates a case archive, case report, case summary, timestamp files, blockchain metadata where enabled, and final case ZIP.
Warning: Treat case closure as a formal evidence-handling action. Do not close a case until you have confirmed the collection scope and export requirements.
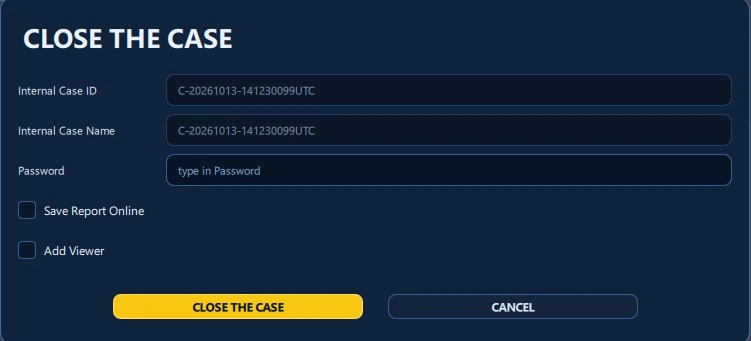
The CLOSE THE CASE dialog displays the Internal Case ID and Internal Case Name. Enter a Password when using the available protected-export workflow, and select optional Save Report Online or Add Viewer settings only when they are appropriate for the matter.
Select CLOSE THE CASE to start final packaging. Allow report generation, file inventory, hashing, timestamping, and archive finalization to complete. Do not modify the case folder or interrupt storage during this operation. A successfully closed case is not intended to be reopened or edited; additional evidence should be documented in a supplemental case or permitted follow-up workflow.
Disclosure reminder: A case package can contain browser state, TLS secrets, attachments, and other sensitive session material. Review its handling classification and deliver its password through a separate secure channel.
6.7 Exporting A Case
A closed case can be exported as a final ZIP package. If a password is used, communicate it through a separate secure channel. Recommended export practices:
- Store the original export in a secure evidence repository.
- Generate transfer copies from the original.
- Record the exported file hash.
- Use encrypted transfer methods.
- Keep password and package separate.
- Document recipient, date, transfer method, and hash verification.
6.8 Closed Cases and Supplemental Work
Closed Eviquire cases cannot be reopened for editing. This protects the integrity of the original closed case package. When additional collection is required after closure, preserve the original export unchanged and create a separate case or supplemental acquisition under a new open case, documenting the link to the original matter.
Do not attempt to modify the closed archive or its included metadata. If information must be provided to a reviewer, create a separate explanatory note or derivative disclosure package and preserve its relationship to the original.